Once you learn the tricks to opening up a coconut, they are a lot less intimidating. Here are the keys to opening up two different types of coconuts.
When you see coconuts in the stores, they are most likely to be either the white, thick skinned, young coconuts or the mature coconuts (smaller hairy things ranging from white to brown).
You should hear coconut water sloshing around inside when you shake them. Yeah, the kind of coconut water that we pay about $1.50 to $2.00 for in a can or tetra pack (like juice boxes). For $1.30 to $2.00 per coconut you not only get about 16 oz of coconut water but some nutritious and yummy coconut meat to go with it for free. Well, except for the fact that you have to work at getting the meat out of it.
Here are a few tricks…
The young coconut
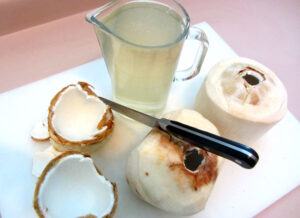
The shell of the young coconut is not nearly as hard as a mature one so it can be opened fairly easily with the proper knife.
It is best to have a heavy duty cleaver. I don’t have one so I used a large kitchen knife with a sharp end as you see in this photo.
First shave off the top of the pointed side of the coconut to get to the shell.
Then use the pointed end of a large knife and hit it around in a circle.
Watch out for an occasional squirt of coconut water!
The circular top opens up and you can drain the coconut water out and drink it or save it for later.
The mature coconut
These are the easiest to get the coconut water out of but the hardest to get to the meat.
There are three indentations on the top of the coconut. These are the soft spots where the coconut would grow a shoot out of if it is left to seed. All you have to do is set a Phillips head screwdriver on one of the holes and tap it with a hammer until it drives its way through. Pull out the screwdriver and put it through the other two holes.
This handy device is made especially to go through the holes instead of using a screwdriver. It is wider than a standard screwdriver so it drains better, but it is harder and more time consuming than the screwdriver which makes a difference if you are an impatient wimp like me. Either way will work. You can get the handy tool here.
Set it upside down to drain into a pitcher. Use a fine mess strainer to catch the small debris.
When draining multiple coconuts, drain them separately in case one of the coconuts is not fresh. This photo shows different qualities of coconut water. I threw the darkest one away because it didn’t smell fresh.
Now to crack the shell open. Maybe you have been to Hawaii and have seen the effortless way the Hawaiians use a cleaver, hitting the shell around the equator while it breaks in half almost perfectly. I don’t have a big cleaver so this didn’t work well for me (I plan on getting one here for next time). Instead, most of us in-landers tend to resort to the ol hammer. Put the coconut into a plastic bag, place it on the concrete outside and whack it with a hammer. Kids loove this part.
The hardest thing to do, like I said is getting the meat out, especially without the right tool. You can always use a flat head screwdriver and work your way between the white meat and the shell until it cracks off. The tool you see here is shaped just for this purpose. It is not sharp but sturdy enough to do the trick. You can get the curved tool here.
You can trim off the brown layer and eat it fresh.
Cut it up into pieces to make Homemade Coconut Milk
Use a shredder to make dried coconut. Put the shredded coconut in a rimmed baking sheet in the oven at the lowest setting possible (around 170 degrees) and place it in the oven for approximately 3 hours. Stir and keep checking until it is dry. Do not try to speed up the process by turning up the heat or you risk it turning brown and tasting like cardboard.  (I tried to use my food dehydrator to keep it under 118 degrees but the fan blew the coconut off the tray- bummer!)
You can make coconut milk or freeze the pieces to use another day.